Location:
38.581573,
-121.494400
Blog Post on this using Indieauth coming soon!
Table of Contents
Introduction
Recently I have started experimenting with identity.
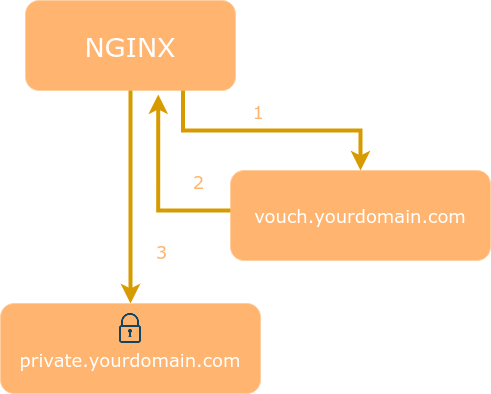
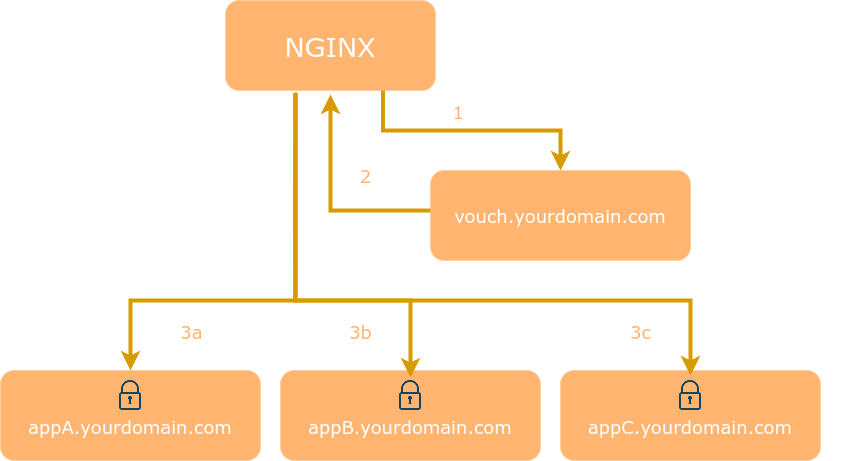
An SSO solution for Nginx using the auth_request module. Vouch Proxy can protect all of your websites at once.
Today, I'll demonstrate how to setup Vouch Proxy on an nginx web server. In this example I will be using Google as our provider
This tutorial assumes you have prior knowledge of using a linux server such as Debian. Message me at hello@lifeofpablo.com if you need some help. I'd be happy to do so!
What Vouch Proxy Does?
According to the Repository README.md, it states the following:
Vouch Proxy (VP) forces visitors to login and authenticate with an IdP (such as one of the services listed above) before allowing them access to a website.

VP can also be used as a Single Sign On (SSO) solution to protect all web applications in the same domain.

After a visitor logs in Vouch Proxy allows access to the protected websites for several hours. Every request is checked by VP to ensure that it is valid.
VP can send the visitor's email, name and other information which the IdP provides (including access tokens) to the web application as HTTP headers. VP can be used to replace application user management entirely.
Things you'll need/prepare:
- A linux server with a public IP address with hosting and SSL
- Debian will be used here but any of the common distros will work
- Certbot is an easy solution to get SSL certifcate for https://
- Go Language (to compile vouch-proxy)
Vouch Proxy
Nginx Web Server
- Digital Ocean has a good guide if you need to learn how to setup virtual blocks in nginx.
Download/Install Vouch Proxy from Github
Make sure to have Go Lang installed
$ git clone https://github.com/vouch/vouch-proxy.git
$ cd vouch-proxy
$ ./do.sh goget
$ ./do.sh build
Vouch Proxy Nginx Virtual Block
Let's go ahead and create a virtual block to proxy Vouch Proxy.
server {
server_name vouch.example.com;
location / {
proxy_set_header Host vouch.example.com;
proxy_set_header X-Forwarded-Proto https;
proxy_pass http://127.0.0.1:9090;
}
Let's go ahead and create a virtual block for a regular nginx website site or edit an existing virtual block. This is the website/service that you will protect with Vouch Proxy.
In this example I am using a php web app. If you a non php site site to work you can remove this location block and and edit it to your needs.
Google Cloud Console
Google Cloud Console API
Before we modify the config.yml, lets create an OAuth 2.0 Client ID and Client Secret which you will paste into the config.yml file.
You will have to do the following
1. Create a Project
- Call it whatever you like.
- I called it oauth
- Create Credentials
- You'll create the client ID and client secret (don't worry if you do the following steps and forget to copy these down. They will be available for you to copy at any time.
- OAuth consent screen
- App Name:
- This is where you will need to setup where your redirect URL is https://vouch.example.com/url. Just like the server_name set in the nginx virtual block config above.
- Authorized Domain: example.com (just the base domain)
- Fill out any other required fields
Modify your config.yml
vouch:
domains:
- yourdomain.com
- yourotherdomain.com
cookie:
secure: false
oauth:
provider: google
client_id: xxxxxxxxxxxx-xxxxxxxxxxxxxxxxxxxxxxxxxxxxxxxx.apps.googleusercontent.com
client_secret: xxxxxxxxxxxxxxxxxxxxxxxx
callback_urls:
- https://yourdomain.com/auth
- https://yourotherdomain.com/auth
preferredDomain: yourdomain.com
Nginx Virtual block protected by Vouch Proxy
server {
listen 80;
listen [::]:80;
root /root/to/web/directory;
index index.php index.html;
server_name secretapp.example.com;
location / {
try_files $uri $uri/ /index.php$is_args$args;
}
client_max_body_size 100m;
location ~* \.php$ {
fastcgi_pass unix:/var/run/php/php8.2-fpm.sock;
include fastcgi.conf;
fastcgi_index yellow.php;
fastcgi_split_path_info ^(.+\.php)(/.+)$;
fastcgi_param SCRIPT_FILENAME $document_root$fastcgi_script_name;
include fastcgi_params;
}
}
Eventually you will need to secure your site with SSL/TLS that makes your site use https://. Google will require that your traffic is secure with using it as 0auth as the method used to sign in to your protected website.
Do this after you have the survey blocks working in the following section.
Here is the link for Certbot for Debian. I have tested this on Debian 10 & 11.
[https://certbot.eff.org/instructions?ws=nginx&os=debianbuster](Link for Certbot)
Cert bot can do this for you as long as you have the subdomain in your DNS pointing to your machine and have cert bot installed. It'll add these blocks in your
or
server {
server_name vouch.example.com
. . . . . . . . . . . . . . . . . . . . . . . . .
listen [::]:443 ssl;
listen 443 ssl;
ssl_certificate /etc/letsencrypt/live/vouch.example.com/fullchain.pem;
ssl_certificate_key /etc/letsencrypt/live/vouch.example.com/privkey.pem;
include /etc/letsencrypt/options-ssl-nginx.conf;
ssl_dhparam /etc/letsencrypt/ssl-dhparams.pem;
}
server {
if ($host = vouch.example.com) {
return 301 https://$host$request_uri;
}
listen 80;
listen [::]:80;
server_name secretapp.example.com;
return 404;
}
Let's check for errors in nginx. Type the following command.
nginx -t
You should see something similar to this:
nginx: the configuration file /etc/nginx/nginx.conf syntax is ok
nginx: configuration file /etc/nginx/nginx.conf test is successful
Let's open a browser tab or window!
Note: I'm using firefox. (Preference). Any modern browser should work.
Type in the protected app' URL in the address bar

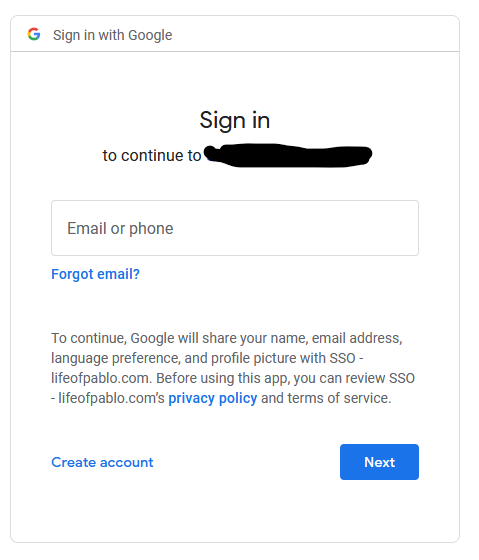
Sign in to Google
Sign in with an email that is allowed to sign to access the website when you configured it in Google Cloud Console.

Voila, the protected page.
Here is the home page of a Bludit CMS on subdomain acting as "secretapp.example.com"


